Hardware Setup
MAVROSPY is supported on a PX4 (v1.15.4) flight controller with a RPi4 (Ubuntu 22.04 MATE), Jetson Nano (JetPack 4.6), or Jetson Orin Nano (JetPack 6.2) companion computer. Additionally, it supported on ROS2 Humble and ROS1 Noetic.
PX4 allows interaction with a companion computer via OFFBOARD mode. Make sure to setup an OFFBOARD mode switch and an Emergency Kill switch in QGroundControl.
If you haven't already, please install Ubuntu MATE 22.04 for the RPi4 (arm64), JetPack 4.6 for the Jetson Nano, or JetPack 6.2 using the Raspberry Pi Imager.
Wiring
This tutorial uses the flight controller's TELEM2 port to communicate with the companion computer.
- RPi4
- Jetson Nano
- Jetson Orin Nano
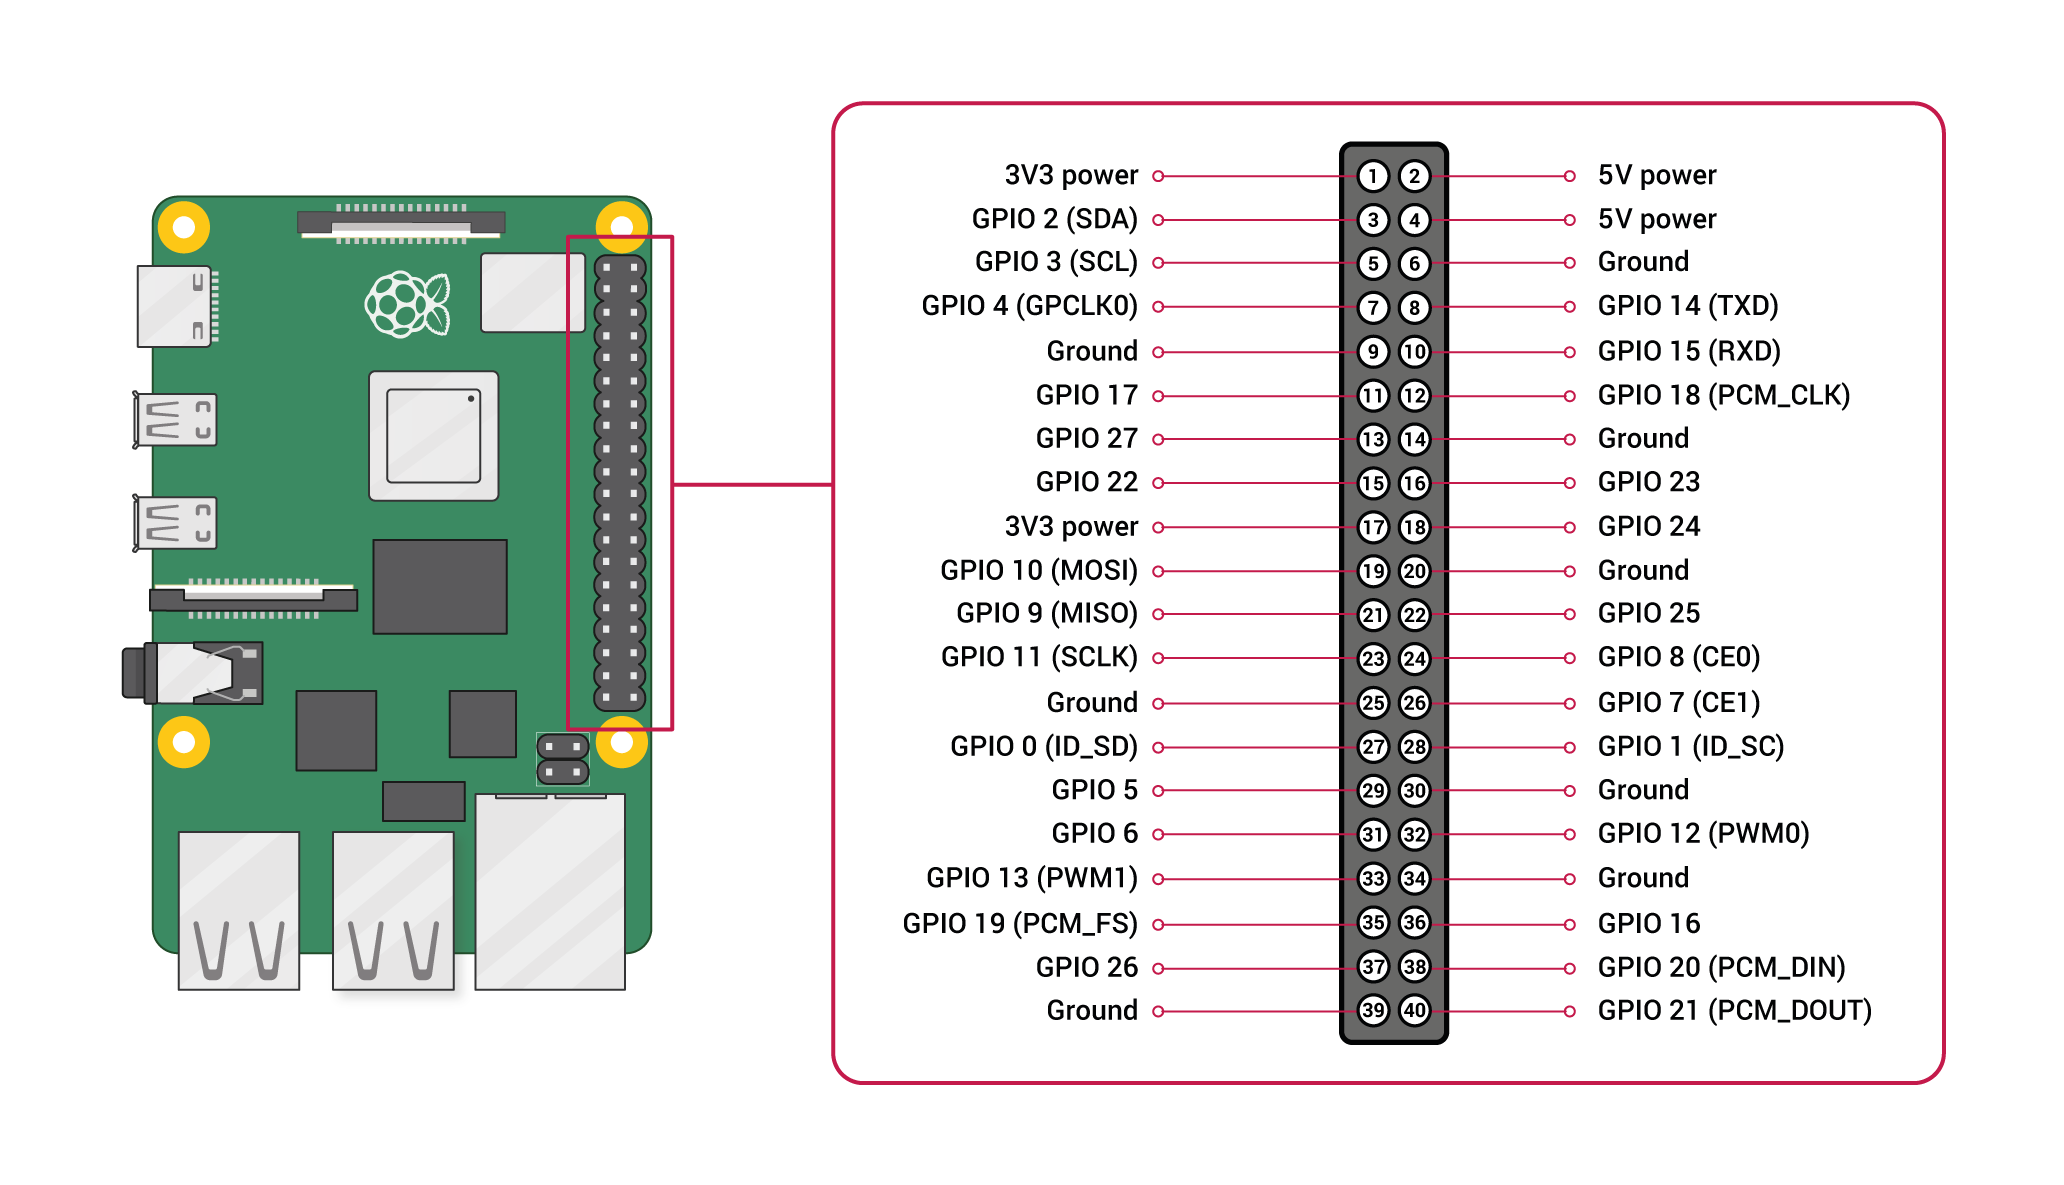
Connect the flight controller's TELEM2 TX/RX pins to the complementary RXD/TXD pins on the RPi4 GPIO board:
| PX4 TELEM2 Pin | RPi4 GPIO Pin |
|---|---|
| UART5_TX (2) | RXD (GPIO 15 - pin 10) |
| UART5_RX (3) | TXD (GPIO 14 - pin 8) |
This diagram shows the RPi4 GPIO board pinout:
The standard TELEM2 pin assignments are shown below:
| Pins | Signal | Voltage |
|---|---|---|
| 1 (Red) | VCC (out) | +5V |
| 2 (Black) | UART5_TX (out) | +3.3V |
| 3 (Black) | UART5_RX (in) | +3.3V |
| 4 (Black) | UART5_CTS (out) | +3.3V |
| 5 (Black) | UART5_RTS (in) | +3.3V |
| 6 (Black) | GND | GND |
The RPi4 requires a separate 5V/3A power supply via the 5V power (pin 4) and Ground (pin 6). I would recommend soldering a battery elimination circuit (BEC) or Polulu voltage regulator to your UAV's power leads.
The Jetson Nano should theoretically be able to communicate with the flight controller via the GPIO pins. However upon testing, the Jetson Nano struggles to communicate with the flight controller due to a possibly noisy data link. I would recommend using a USB to UART adapter to communicate with the flight controller.
Connect the flight controller's TELEM2 TX/RX pins to the complementary RXD/TXD pins on the USB to UART adapter:
| PX4 TELEM2 Pin | USB To UART Adapter Pin |
|---|---|
| UART5_TX (2) | RXD |
| UART5_RX (3) | TXD |
The standard TELEM2 pin assignments are shown below:
| Pins | Signal | Voltage |
|---|---|---|
| 1 (Red) | VCC (out) | +5V |
| 2 (Black) | UART5_TX (out) | +3.3V |
| 3 (Black) | UART5_RX (in) | +3.3V |
| 4 (Black) | UART5_CTS (out) | +3.3V |
| 5 (Black) | UART5_RTS (in) | +3.3V |
| 6 (Black) | GND | GND |
The Jetson Nano requires a separate 5V/3A power supply via the 5V power (pin 4) and Ground (pin 6). I would recommend soldering a battery elimination circuit (BEC) or Polulu voltage regulator to your UAV's power leads.
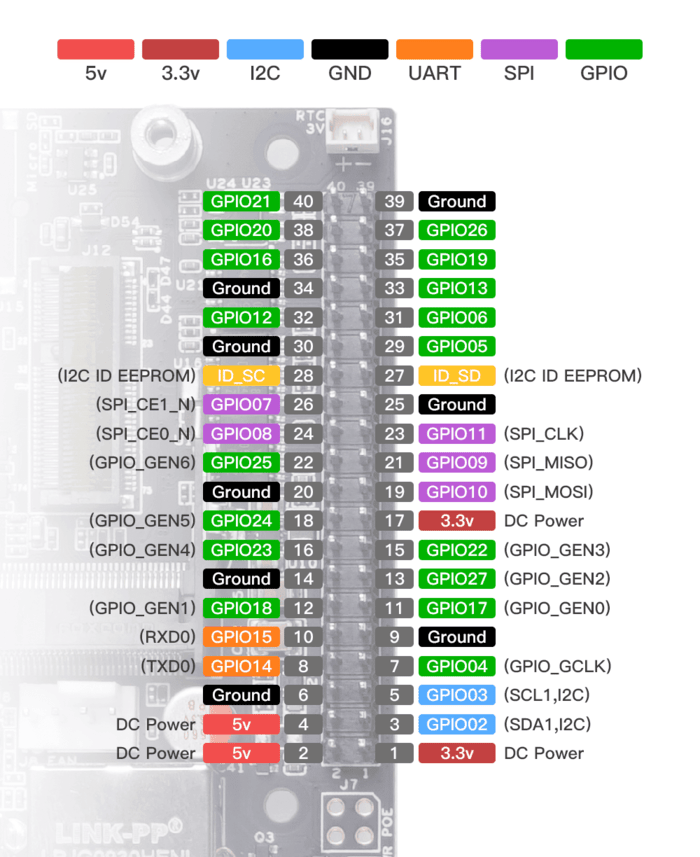
This diagram shows the Jetson Nano GPIO board pinout:
The Jetson Orin Nano should theoretically be able to communicate with the flight controller via the GPIO pins. However upon testing, the Jetson Orin Nano struggles to communicate with the flight controller due to a possibly noisy data link. I would recommend using a USB to UART adapter to communicate with the flight controller.
Connect the flight controller's TELEM2 TX/RX pins to the complementary RXD/TXD pins on the USB to UART adapter:
| PX4 TELEM2 Pin | USB To UART Adapter Pin |
|---|---|
| UART5_TX (2) | RXD |
| UART5_RX (3) | TXD |
The standard TELEM2 pin assignments are shown below:
| Pins | Signal | Voltage |
|---|---|---|
| 1 (Red) | VCC (out) | +5V |
| 2 (Black) | UART5_TX (out) | +3.3V |
| 3 (Black) | UART5_RX (in) | +3.3V |
| 4 (Black) | UART5_CTS (out) | +3.3V |
| 5 (Black) | UART5_RTS (in) | +3.3V |
| 6 (Black) | GND | GND |
The Jetson Orin Nano also requires a separate 7-20V power supply with a max power consumption of 36W. The power supply should be connected to the Jetson Orin Nano's barrel jack or USB-C port as seen below:

PX4 Parameters
Assuming you have installed the latest PX4 firmware, change the following parameters in QGroundControl:
   MAV_1_CONFIG = TELEM2
   UXRCE_DDS_CFG = 0
   SER_TEL2_BAUD = 921600
Setting up SSH
SSH allows us to remotely issue commands to the companion computer over Wi-Fi.
Install the openssh-server package on your companion computer:
$ sudo apt update
$ sudo apt install -y openssh-server net-tools
The SSH service will start automatically. We can verify this by entering:
$ sudo systemctl status ssh
You should see Active: active (running) somewhere in the status report. CTRL+C to exit.
On your publishing computer, SSH to your companion computer. Make sure you change username to your companion computer's username and ip_address to your companion computer's IP address:
$ ssh username@ip_address
Remember, you can always check your IP address via:
$ ifconfig
If you forget your username, you can alway run:
$ echo $USER
We can now issue commands to our companion computer via SSH rather than having it hooked up to a monitor with a mouse and keyboard.
Enable UART (RPi4 Only)
Open the firmware boot configuration file:
$ sudo nano /boot/firmware/config.txt
Append the following text to the end of the file (after the last line):
enable_uart=1
dtoverlay=disable-bt
Save and exit the file.
Test Connection
MAVLink is the default and stable communication interface for working with PX4.
We can test that the companion computer and flight controller are communicating with each other via a MAVLink GCS called mavproxy.
Run this command to add your user to the dialout group:
$ sudo adduser ${USER} dialout
Restart your companion computer.
- RPi4
- Jetson Nano
- Jetson Orin Nano
You can check that the serial port is available by issuing this command:
$ ls /dev/serial0
The result of the command should include the RX/TX connection /dev/serial0
Install MAVProxy:
$ sudo apt install -y python3-pip
$ sudo pip3 install mavproxy
$ sudo apt remove -y modemmanager
Run MAVProxy, setting the port to connect to /dev/serial0 and the baud rate to match the flight controller (921600):
$ sudo mavproxy.py --master=/dev/serial0 --baudrate 921600
MAVProxy on the RPi4 should now connect to the flight controller via its RX/TX pins. You should be able to see this in the terminal. CTRL+C to exit.
You can check that the serial port is available by issuing this command:
$ ls /dev/ttyUSB0
The result of the command should include the RX/TX connection /dev/ttyUSB0
Install MAVProxy:
$ sudo apt install -y python3-pip
$ sudo pip3 install mavproxy
$ sudo apt remove -y modemmanager
Run MAVProxy, setting the port to connect to /dev/ttyUSB0 and the baud rate to match the flight controller (921600):
$ sudo mavproxy.py --master=/dev/ttyUSB0 --baudrate 921600
MAVProxy on the Jetson Nano should now connect to the flight controller via its RX/TX pins. You should be able to see this in the terminal. CTRL+C to exit.
Install Docker
Installing Docker on Ubuntu is very easy and will allow us to build the ROS environment onto the companion computer in just a few steps.
This is a summarized version of the offical installation insructions.
- RPi4
- Jetson Nano
- Jetson Orin Nano
Setup Docker's apt repsitory:
$ sudo apt install -y ca-certificates curl
$ sudo install -m 0755 -d /etc/apt/keyrings
$ sudo curl -fsSL https://download.docker.com/linux/ubuntu/gpg -o /etc/apt/keyrings/docker.asc
$ sudo chmod a+r /etc/apt/keyrings/docker.asc
$ echo \
  "deb [arch=$(dpkg --print-architecture) signed-by=/etc/apt/keyrings/docker.asc] https://download.docker.com/linux/ubuntu \
  $(. /etc/os-release && echo "$VERSION_CODENAME") stable" | \
  sudo tee /etc/apt/sources.list.d/docker.list > /dev/null
$ sudo apt update
Install the Docker packages:
$ sudo apt install -y docker-ce docker-ce-cli containerd.io docker-buildx-plugin docker-compose-plugin
Create the docker group if not already created:
$ sudo groupadd docker
Add your user to the docker group:
$ sudo usermod -aG docker $USER
Restart so that your group membership is re-evaluated.
We can verify our Docker installation via:
$ docker run hello-world
Jetpack already comes with Docker installed!
Add your user to the docker group:
$ sudo usermod -aG docker $USER
Restart so that your group membership is re-evaluated.
We can verify our Docker installation via:
$ docker run hello-world
Jetpack already comes with Docker installed!
Add your user to the docker group:
$ sudo usermod -aG docker $USER
Restart so that your group membership is re-evaluated.
We can verify our Docker installation via:
$ docker run hello-world
Build MAVROSPY Docker image
Now that Docker is installed properly, we can build our Docker image and run it in a Docker container.
Clone the mavrospy repository:
- ROS2
- ROS1
$ cd ~
$ git clone -b ros2 https://github.com/bandofpv/mavrospy.git
$ cd ~
$ git clone -b ros1 https://github.com/bandofpv/mavrospy.git
- RPi4
- Jetson Nano
- Jetson Orin Nano
Build via the run_docker.sh script:
$ cd ~/mavrospy/docker/rpi
$ bash run_docker.sh
The script will automatically start building the MAVROSPY docker image and run it in a container.
CTRL+D to exit the container.
Build via the run_docker.sh script:
$ cd ~/mavrospy/docker/jetson
$ bash run_docker.sh
The script will automatically start building the MAVROSPY docker image and run it in a container.
CTRL+D to exit the container.
Build via the run_docker.sh script:
$ cd ~/mavrospy/docker/jetson
$ bash run_docker.sh
The script will automatically start building the MAVROSPY docker image and run it in a container.
CTRL+D to exit the container.